One of the most difficult aspects of improving your time around the course is understanding and applying tactics. A plethora of fantastic sailing books have been written on tactics but the simple fact of the matter is you only get so good by reading; real world experience goes a very long way and most likely has a lot to do with why the best windsurfing racers in the World are all in their 30’s. Since handheld personal GPS units have become available and popular it has opened a whole new kettle of fish into how we can learn, train and critique our tactics around the course. In this article I am going to show you how to create GPSAR (GPS Action Replays) of your local fleet’s racing which will let you play back the races in real-time; a perfect way to fine tune your tactics to be ready for the second day of racing.
Since this will be a long article, I’ve decided to break it up into two parts. The first will be a tutorial on how to create a GPSAR (GPS Action Replay is a program designed to replay GPS tracks simultaneously for review) to review any race you have competed in. The second part will be how to analyse this data more efficiently and some tips on the easiest things to improve, now that you have a way of reviewing your racing.
For the record, GPSAR was brought to the forefront of the Formula Windsurfing public eye by Devon Boulon and Ian Fox at the 2005 FW Worlds in Australia. Unbeknownst to many at that event, a few of us in Sydney, Australia, had already be doing these replays for over 2 seasons and felt quite robbed by Devon taking the glory. In fact, some of what was done in Australia with the help of Jan (creator of GPSAR) has paved the way for the new version of GPSAR Pro.
To give you some examples of what I am talking about here, please visit the site below. This is a windsurfing club in Sydney, Australia, at which we have run our races for many years with the top riders using GPS units while they race. (You will require only Java Runtime Environment to view these files, see below for a download):
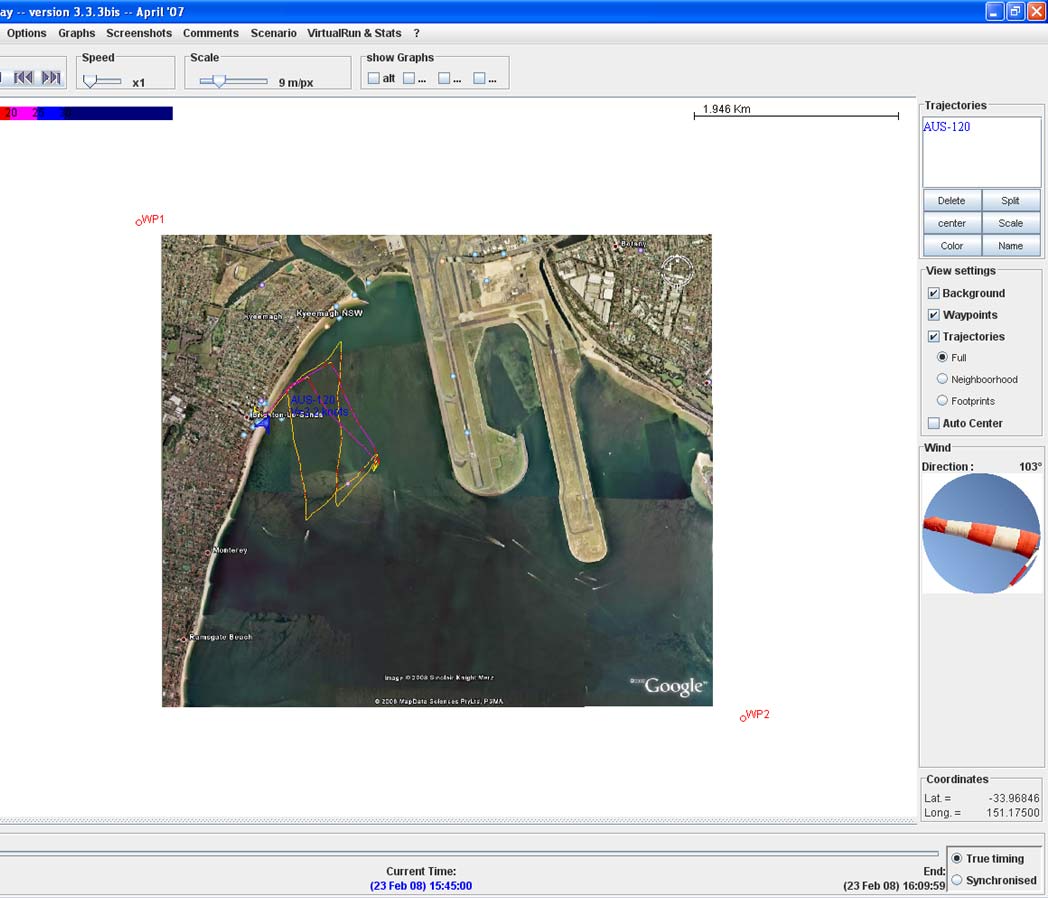
GPSAR allows you to upload any number of GPS tracks simultaneously onto one screen, and even underlay that screen with a map of the location. With this program, you can change the speed and view of the race whilst you watch and then very easily see how everyone got to the finish line in the positions they did (whereas in reality, you can only see who’s within earshot of you on the racecourse). All you need to do is next time you go sailing, take your GPS unit and make sure a couple of rivals also have theirs. Record the tracks at the end of the day onto one computer then follow this tutorial…
So let’s begin the tutorial.
Please note, the pictures in this gallery are named accordingly with the STEPS in this tutorial to help you understand better. I have also included a link to each figure within the title of each step, to help us lazy people who hate scrolling back up anytime.
GPSAR TUTORIAL
To be able to make the GPSAR’s you will require the following software. I have done this by using FREE software rather than programs you need to pay for:
- GPSAR ver 3.3.3 (old “classic” version) – the new version is paid for.
- Java Runtime Environment
- G7toWin (used to cut the tracks into separate days etc, GPSAR can only work on tracks used for one day, G7towin can do +2 days. It can also handle various file formats and is needed to create the waypoints that sync the maps)
- Google Earth (used to create maps and it gives you the coordinates to place your maps)
- Microsoft Notepad (used as a html editor) – any text editor will work here. I actually use Dreamweaver MX but its paid for.
- Microsoft Picture Manager (used as a photo editor) – any photo editor will work here. I use Photoshop but again, this is paid for and I’m aiming to do this for free.
- NAVi users: GPS Results, GPSAR Pro, or RealSpeed. (please note, these are all PAID FOR programs and are required to convert the .sbn files to .gpx format. Sorry guys, why don’t you just buy a Garmin?)
For the record, I prefer Garmin GPS units for FW analysis. I apologise to all the avid NAVi GPS fans out there but in the time I’ve edited tracks of FW races to put into GPSAR’s, I’m yet to see a clean NAVi track. They seem to be more vulnerable to losing the signal in patches; despite what version software is used. The Garmin Edge/Forerunner series are flawless, everytime.
To begin, you require all the tracks from everyone who sailed that day who you wish to include in the replay. About 4-8 people is best, as more than this and the screen becomes cluttered and more difficult to view the tactics. Take the best 4-8 people in your fleet who wear GPS units.
STEP 1 (Edit the Files into One Day)
GPSAR has a 24 hour clock inbedded and cannot handle multiple days of data. If someone gives you a track with 3 days of data (as everyone who owns a NAVi seems to do!), you need to use G7toWin to split the track into 3 separate days. The aim is to create files that have 1 day on them.
To edit, highlight the first line of the track to be removed, then scroll down until you find the next day of data and highlight the last of the first day. Right-click and select DELETE SELECTED TRACK ELEMENTS. Save this file as a new file with a name like ‘day1_aus120.gpx’.
STEP 2 (Manage the Files)
Make a directory with each day’s racing and put the edited tracks into this directory.
- I suggest you come up with a nice and unified way of naming your files to keep it organised and clean. Something like day1_aus120.gpx (where I’ve used the sail number of who’s track it is and the date).
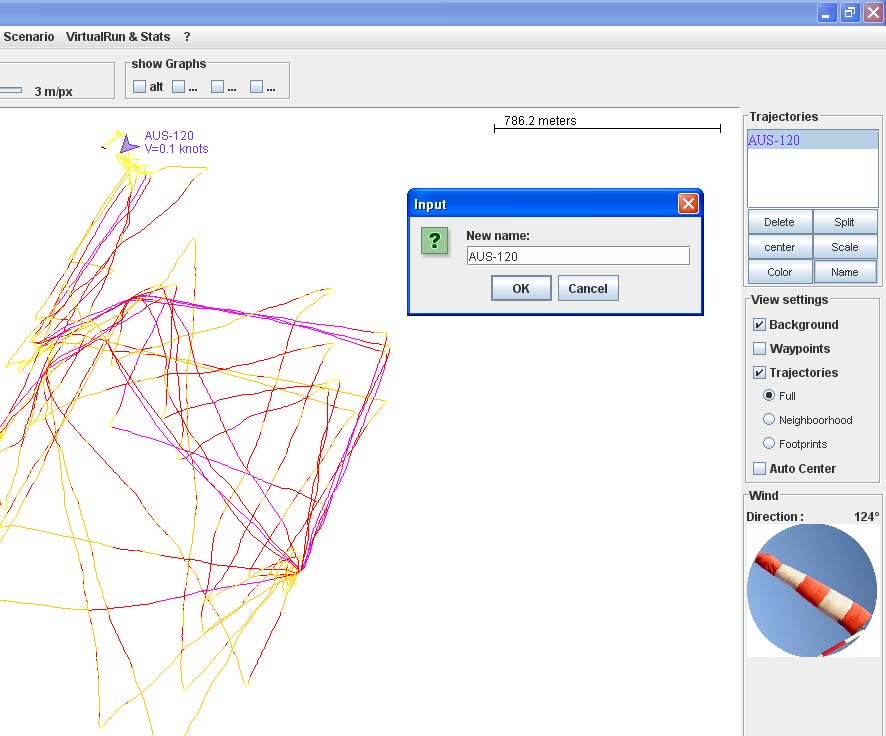
Open GPSAR and open each sailor’s edited track and give them a name (ie, SAIL NUMBER) and then a unique colour (think about what colour map you are going to use to pick colours, so that they stand out), then save the individual tracks again with this new information. To change the name and colour, click the NAME and COLOR buttons on the right hand sidebar underneath the Trajectories.
STEP 3 (Start/Finish Times)
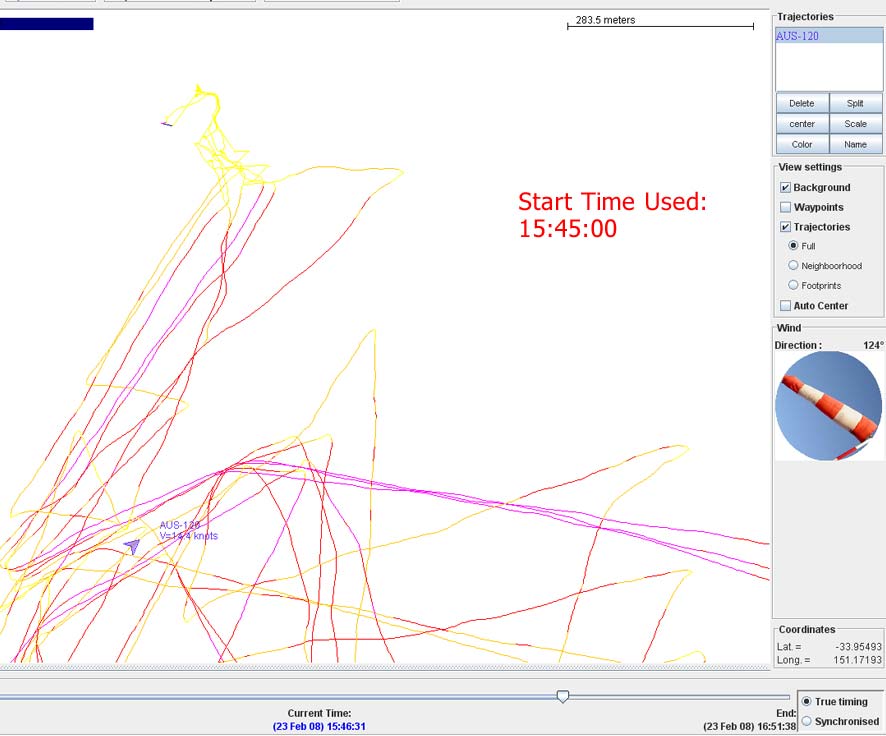
Pick someone who is in the top of the fleet (easiest to do with the winner). Open his track in GPSAR and using the scroll bar at the bottom, scroll through his track and find the times (roughly) where he starts the race and finishes. GPSAR can only cut the tracks to the nearest 5:00 mins so write on a piece of paper the nearest 5:00 mins before the start and roughly 10-15 mins after he finishes (depending on the level of your fleet who’s tracks you are using – ie, you want everyone to have finished within that 10-15 min window).
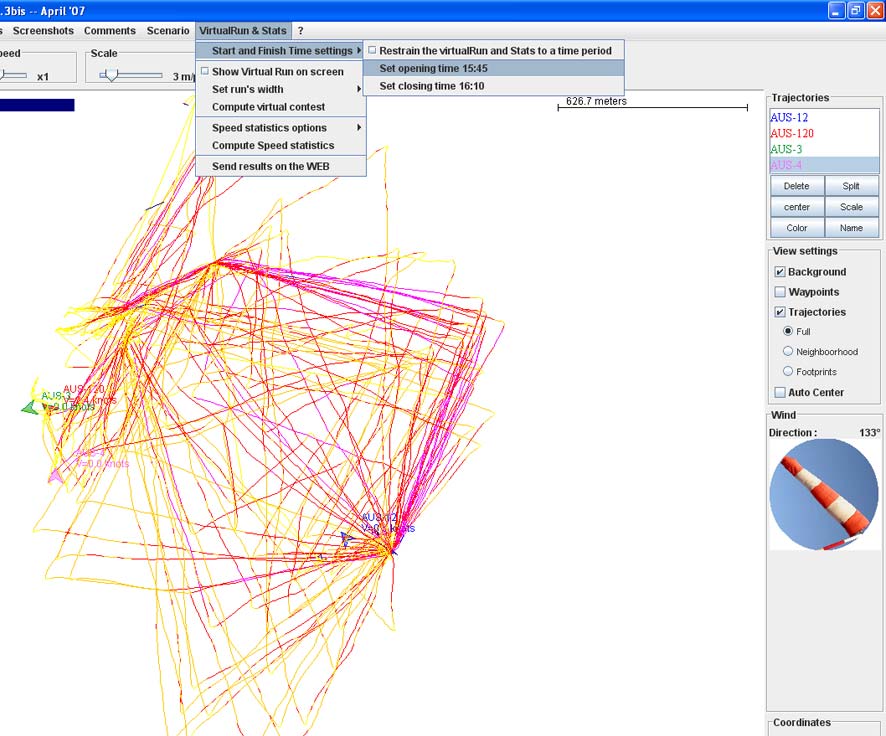
STEP 4 (Let’s do Race 1)
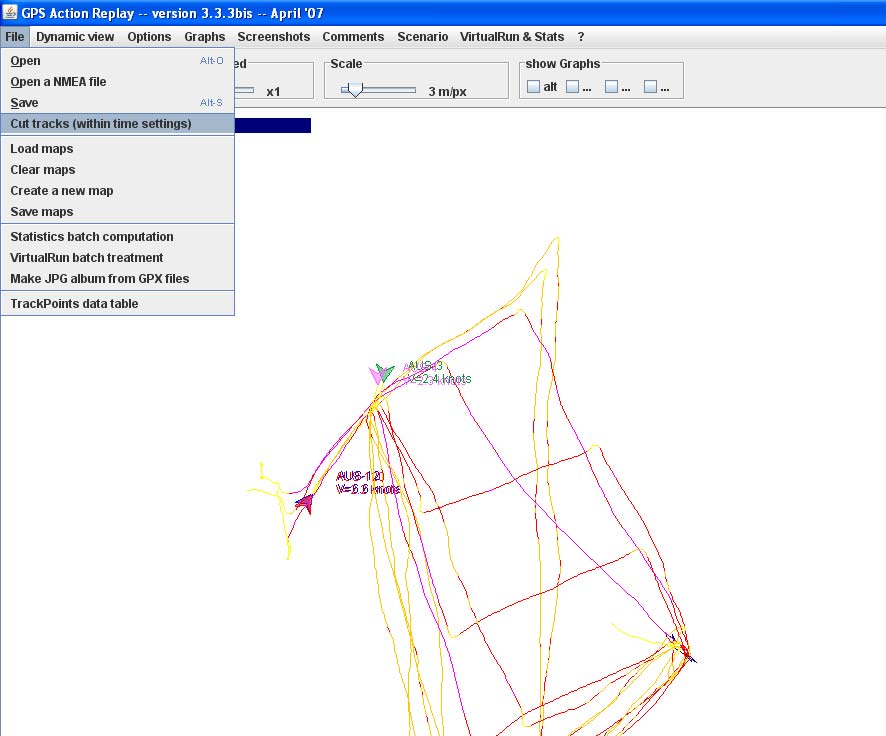
Clear GPSAR and then load everyone’s track one by one so all the data is on the screen. I suggest you load them in numerical order (just to be consistent and keep everyone in the same spot each race). Set the start time and finish time by using the appropriate items on the VIRTUAL RUN & STATS menu, then cut it using CUT TRACKS (WITHIN TIME SETTINGS) on the FILE menu. Save that as Race1.gpx. You are basically saving the entire race now.
If you want a shortcut to this step and you have a LOT of ram in your computer: load everyone in and then save all the tracks as one file called DAY1.gpx. Then using the start and finish times, cut it and save it as Race1.gpx. So next time you open it you can just open DAY1 instead of the individual tracks each time. This is quicker, but you would need at least 3-4GB of RAM to be able to handle this, otherwise your computer may explode!
Repeat this step for as many races as you want replays for. ie, Race1, Race2, Race3, Race4, Race5 etc etc…
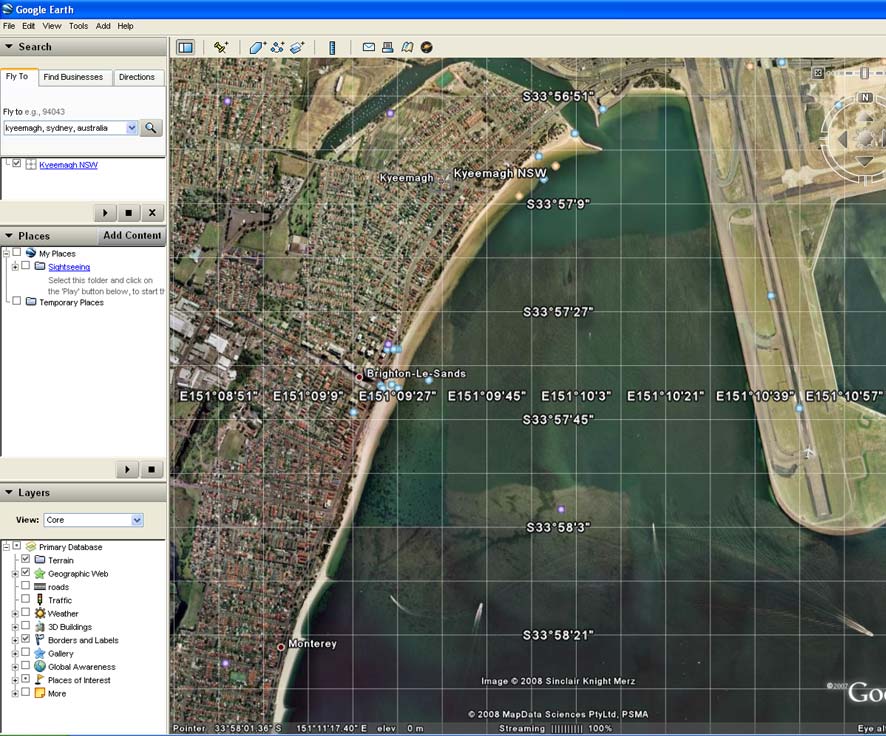
STEP 5 (Create a Pirate’s Treasure Map)
To create a map, take your original sailor who’s track you used to define the start/finish times. Take his FIRST race and save it as a file. Go into GoogleEarth and find the location of where you have been sailing, then do a screen dump [Print Screen button] of this location. Then take the coordinates (using your mouse hovering over the screen, you will be given longitude/latitude coordinates on the taskbar) from the very top left corner and bottom right corner of the screen.
Use any photoeditor (I like Photoshop) to edit the picture so you only can see the map, not the control panel of GoogleEarth. Save the edited map file as a .jpg file.
- TIP: put the grid on in GoogleEarth, to help you get your bearings, then take it off before you do the screendump.
Put the .jpg file of your map into a directory called /maps/ within the directory you have all your tracks in(needs to be smallcase).
STEP 6 (Calibrating the Map)
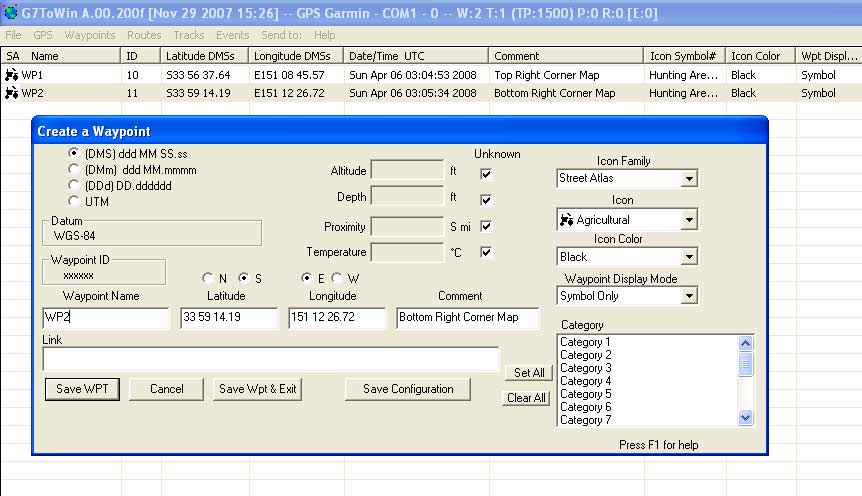
Open up the original sailor’s track you used in Step 6 in G7toWin and insert waypoints for the top left and bottom right corners of the track by using CREATE on the WAYPOINTS menu. [See Figure 6 in the gallery to make sure you’ve entered the coordinates correctly]. Save this file.
Open GPSAR and load the track (now with waypoints) and switch waypoints on (tick box on right sidebar) and load the .jpg map file using FILE ~ CREATE A NEW MAP. Zoom the scale out so you can see the map in its entirety and the waypoints (WP1, WP2) and then hold down the SHIFT and CONTROL keys and using your mouse you drag the waypoints over the map. This is explained on pages 65-70 on the GPSAR Pro Full Manual. Then save the map: FILE ~ SAVE MAPS.
The map is now calibrated.
STEP 7 (Setup the Applet)
You need to make a new folder with these 9 files in it (for 4 races); the extra file is the gpsar.jar file. Here’s one I prepared earlier (download mine, because you MUST have all these files included):
- DOWNLOAD GPSAR Sample Folder (1.12 MB zip file)
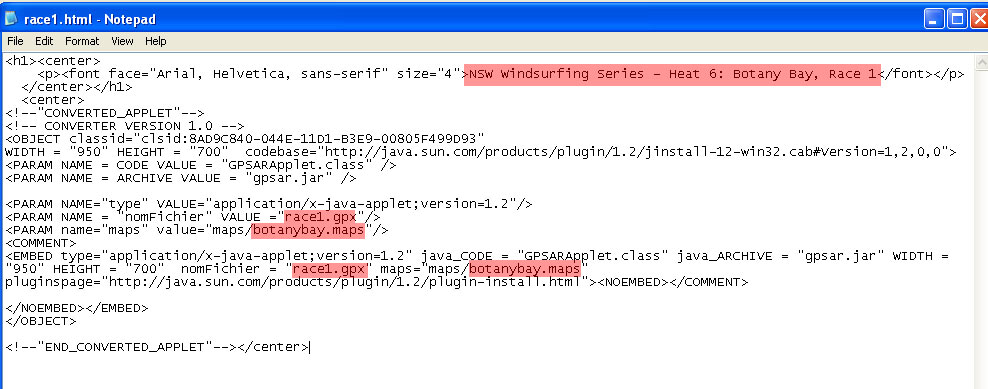
I have included in their all the race files called race1.html etc. Use these standard files and edit it with your HTML Editor, making note of the screen resolution (you can put a nice heading in it as well) and then save it, like “Race 1 – Champion of the Universe Grand Prix”. In Figure 7 you can see highlighted in pink what parts of the .html file need to be edited.
Open the HTML file in your web browser. It should load the maps (it may ask for cookies or an ActiveX application, select yes). Make sure you remembered to install the Java Runtime Environment, otherwise this could get ugly…
STEP 8 (Optimising for Better Analysis)
You’ve actually finished by this stage, but to help you better analyse the racing here’s a few tips on setting up GPSAR to look nice and clean…
A) Compare Side-by-Side Performance:
Pick on the fastest guy on the course, centre to him by right-clicking your mouse on him. Select FOOTPRINTS on the View Settings panel on the right side. Wind the speed up to around x6 on the top bar and adjust the zoom scale to maximum.
B) Identify Tactics:
If you want to analyse the tactics, tide influences, wind shifts and course differences, adjust the scale to fit the entire race into the screen. Wind the speed up to around x10-15 and select NEIGHBOURHOOD on the View Settings Panel.
If you want, you can get fancy with Photoshop and put the buoys in… But I’ve noticed doing this that buoys actually drift further than you think over a day’s racing!!
That’s it.


Looking forward to your Part II!!!
Track of the discontinued Navi GT-11 might not be clean.
But the new Navi GT-31 which using the same SiRF III chip as Garmin Edge/Forerunner, generate the perfect and clean track and much cheaper!!! 🙂
That’s good to hear.
I don’t have any experience with the new Navi’s but the previous ones seemed to be having all sorts of issues (also with durability) from what I’ve seen. The SiRF III chips rock; wonder why it took so long for them to go with it!
Thanks for the comment, I’ll update this post soon to reflect the new Navi model’s new found abilities.
Nice work Sean! Here is the first vid on startline transits http://www.youtube.com/watch?v=5DV0xH6RBW0
haha, awesome! cheers buddy.
My site will take a SBN, SBP or GPX file and spit out a kml file you can use in Google Earth. It doesn’t cost anything to use. (http://www.ka72.com)
It doesn’t convert SBN files to GPX files, but you CAN use GPSBabel to do that for free. (http://www.gpsbabel.org/)
Just another couple of freebies for you…