If you’ve been sailing FW for a few seasons then no doubt you’ve broken a mast at some point or know someone who has. Ever wondered what you could do with the broken pieces? With just one ‘bottom section’ you can build yourself a custom carbon extender at any length, which will help prevent you bending your expensive aluminium extension when you are extending it +30cm. In 10 easy steps we will show you how to build an extender out of your broken mast section and impress your friends at the beach.
INGREDIENTS:
- 1x mast bottom section (broken or complete)
- 1x mast top section (to be used as a hammer!)
- Hacksaw & sharp knife/blade
- Sandpaper with block (80-120 grit)
- Acetone & an old rag
- Epoxy & Q-Cell Filler
- 300mm x 200mm piece of 200g per m2 “plain weave” carbon
- File (the bigger the better)
- Bank/Credit card (an expired one!)
- Plastic cup & stirrer
- Rubber gloves
- Masking Tape & a Pen
- Clear Plastic film (any thickness, any size)
- Tape measure.
- Glass of beer (optional)
Let’s get to work. I would suggest doing this outside (or in the garage if you’d like to escape your other half).

Step 1 – Cutting.
 Cut the broken mast section to a length of 460mm (obviously one end is the bottom of the mast) – important to make the cut square to the edge of the section (otherwise in use the mast will bear on a point instead of the full circumference – refer Step 9.). You can check by putting the cut edge against the bottom of a mast and marking the high points; sand the high points using 80 grit on a sanding block.
Step 2 – Sliding.
 Select the section to use as the spigot which needs to be 270mm long (pink section in Figure 1a). The mast has a taper starting at about 600-900mm above the base. Slide the ferrule of the broken mast through the mast extender from the bottom until it is a firm fit. Mark 150mm above the top of the mast extender; this is approximately the top of the spigot. Remove the broken mast and mark the 270mm spigot + 50mm both ends of the proposed spigot. I use the masking tape to make these markings.
Step 3 – Knife Me.
 Remove any plastic film/stickers/graphics on the mast so that carbon is exposed (best to use the sharp knife/blade to scrape and remove any film). Give the spigot a clean with the acetone to remove any glue used on the film and then a light sand to remove any high spots. Now slide the broken mast inside the mast extender, get a firm fit – maybe force it a little and then re-mark 150mm above the top of the mast extender. This point may have moved from the mark you made in Step 2. After you have removed the film and given it a sand, remove the broken mast.
Step 4 – More Cutting.
 Cut the mast 270mm below the mark made in Step 3. Next, cut the broken mast 50mm above the mark made in step 3. Now the spigot will be 270mm long + 50mm at the top as a contingency that you will remove later (Step 6) after the spigot is glued to the mast extender.
Step 5 – Cleaning & Peanut Butter
 Clean the inside of the top of the mast extender and the outside of the bottom of the spigot with acetone. In your plastic cup, mix up an adhesive paste using epoxy and Q-cell (filler) to the consistency of soft peanut butter and coat both surfaces with this adhesive. Slide the spigot up from the bottom until you have 150mm + 50mm of contingency extending above the top of the mast extender. Now with a rag and acetone clean any adhesive on the inside of the mast extender below the spigot (otherwise it will foul the adjustable mast extension).
Step 6 – Cutting? Oh yes we do.
 When the adhesive is set, cut the extension of the spigot to length – 150mm above the tip of the mast extender. Next repeat Steps 2. 3. 4. & 5 for the reinforcing cylinder (blue section in Figure 1a). Tap the reinforcing cylinder into position with a mast top section. Important to get a firm fit; it will not be perfect as the taper angles vary slightly, but it needs to be firm!
Step 7 – Carbon Time!
 When Step 6 is complete before the adhesive sets, you can then build up the diameter of the spigot where it extends inside the mast. As this section is tapered use 1 layer of carbon reinforcement 150mm long and then a second wrap 75mm long (carbon rectangular strips will be approx 170mm wide – circumference of spigot + 10mm overlap). Mask the top 50mm of the mast extender to avoid painting with epoxy in the next step. Give the spigot a light sand and then clean with acetone. Wet-out the carbon with epoxy resin on a film of plastic and then use your bank card to remove the surplus resin. Apply a light coat of epoxy resin to the surface of the spigot and then lay-up the carbon over the spigot using a gloved hand. Now you need a strip of clear plastic about 40mm wide that you will wind tightly around the carbon overlapping the proceeding layer by 50%. If you cannot find plastic, use insulation tape (do not use masking tape – it will stick to the carbon).
This plastic/tape clamps the carbon around the spigot to ensure a good adhesion and squeeze out the air and surplus resin that may be entrapped below the carbon. Do this step carefully so that the carbon threads in the weave remain straight (If you try to tighten too much the carbon layer will twist around the spigot). Position the lap in the top layer at 900 to the lap in the bottom layer.
Step 8 – File Me!
 After the epoxy has cured, use a file or sand paper to remove surplus epoxy at the step where the mast touches the mast extender. It is important to have a well defined step to seat against the bottom of the mast. Now sand the carbon layers on the spigot until the mast will fit; it is preferable to have a firm fit not sloppy. You will need to sand the lapped areas first to remove high spots. I find it best to get a strip of sandpaper about 50mm wide, 250mm long and use it like you would polish your shoes (covering half a circumference).
Step 9 – More Filing.
 When the mast will slide over the spigot check that you have good contact around the full circumference at the step; you may need to use a file to remove any high spots.
Step 10 – Oh yes!
 Drink your glass of beer.
SAFETY
Use a pair of disposal gloves to avoid getting epoxy or acetone in contact with your skin. Step 7 is quite messy as you will have to handle the wet epoxy carbon laminate. If you get epoxy on your skin it is preferable to use a laundry power to remove the epoxy – not acetone as it is absorbed through your skin and will lodge in you kidneys.
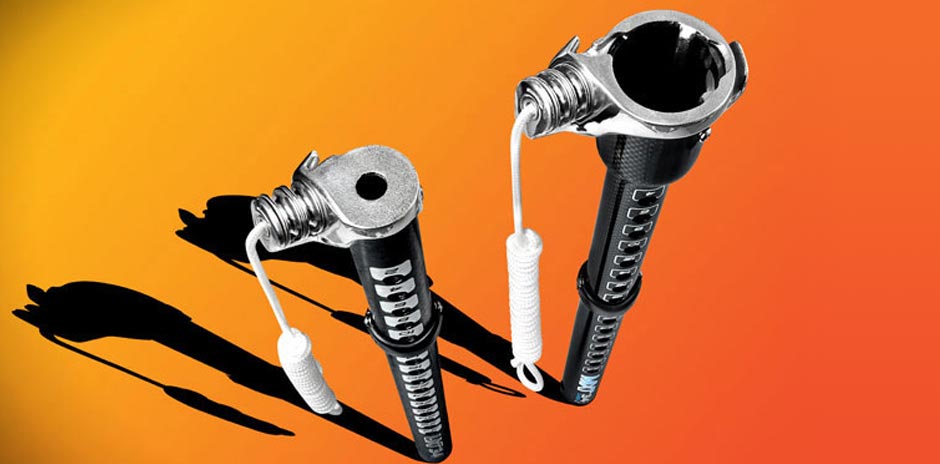
Photos by James Briggs & Sean O’Brien


